悩ましいプログラミングが大好物の、ユゲタです。
なんか難し〜な〜と思った処理を、1日ぐらいかけて成功させることができたら、その都度感無量です。
自分で自分を褒めたくなります。
そうしてまた、プログラミングが好きになっていくんですね。
今回は、HTMLで表示する、親子構造になっている階層構造の子階層を、親要素に追従するための処理を行う必要があって、その計算を三角関数処理で行う必要があったので、この意味わからない処理を実現させたソースコードを備忘録しておきたいと思います。
いったいどういう事?
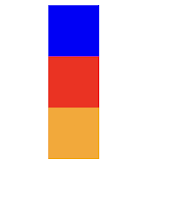
次のようなHTMLで入れ子の親子構造になっている状態で次のようなタグ構造と考えてください。
<div class='parent'>
  <div class='child'>
    <div class='grandchild'>
    </div>
  </div>
</div>

<style>
div{
  position:absolute;
  top:100px;
  width:100px;
  height:100px;
}
.parent{
  top:10px;
  left:300px;
  background-color:blue;
}
.child{
  left:0;
  background-color:red;
}
.grandchild{
  left:0;
  background-color:orange;
}
</style>

これにそれぞれ同じ角度をつけてみると、次のようになります。
div{
  transform:rotate(30deg);
  transform-origin:top left;
}

canvasで表示
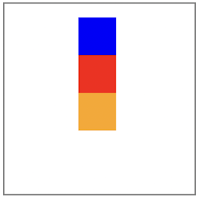
さて、今回はこれをcanvasタグで表示しなければいけないので、まずは、カンタンに次のように表示をしてみました。
<canvas id="canvas" width="256" height="256"></canvas>

<script>
var canvas = document.getElementById("canvas");
var ctx    = canvas.getContext("2d");
ctx.strokeRect(1,1,canvas.width - 2,canvas.height- 2)

fill(100,20,50,50 , 'blue')
fill(100,70,50,50 , 'red')
fill(100,120,50,50 , 'orange')

function fill(x,y,w,h,color){
  const canvas = document.getElementById('canvas')
  const ctx    = canvas.getContext("2d");
  ctx.fillStyle = color;
  ctx.fillRect(x,y,w,h)
}
</script>

ほぼほぼ同じ見栄えです。
canvasは親子構造を計算しなければいけないんじゃ
今回の最大の難点は、HTMLのDOM構造と違ってcanvasは、親子構造という概念を持ってくれていないので、自分で親子構造を計算してあげなければいけません。
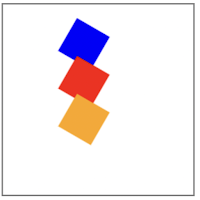
とりあえず、それぞれのboxを回転させてみます。
<canvas id="canvas" width="256" height="256"></canvas>

<script>
var canvas = document.getElementById("canvas");
var ctx    = canvas.getContext("2d");
ctx.strokeRect(1,1,canvas.width - 2,canvas.height- 2)

fill(100,20,50,50 , 'blue' , 30)
fill(100,70,50,50 , 'red' , 30)
fill(100,120,50,50 , 'orange' , 30)

function fill(x,y,w,h,color , r){
  const canvas = document.getElementById('canvas')
  const ctx    = canvas.getContext("2d");
  ctx.translate(x , y);
  ctx.rotate(r * Math.PI / 180);
  ctx.fillStyle = color;
  ctx.fillRect(0,0,w,h)
  ctx.rotate(-r * Math.PI / 180);
  ctx.translate(-x , -y);
}
</script>

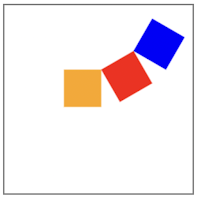
とりあえず、それぞれのboxを回転するのを確認できましたが、親子構造は作り手側でセットして、とりあえず完成形のソースは次のとおりです。
<canvas id="canvas" width="256" height="256"></canvas>

<script>
window.canvas = document.getElementById("canvas");
window.ctx    = canvas.getContext("2d");
ctx.strokeRect(1,1,canvas.width - 2,canvas.height- 2)
const w = 50
const h = 50

const r1 = 30
const x1 = 200
const y1 = 20
fill(x1,y1,r1,w,h,'blue')

const r2 = r1 + r1
const p2 = rotate_pos(0 , h , r1)
const x2 = x1 + p2.x
const y2 = y1 + p2.y
fill(x2,y2,r2,w,h,'red')

const r3 = r1 + r2
const p3 = rotate_pos(0 , h , r2)
const x3 = x2 + p3.x
const y3 = y2 + p3.y
fill(x3,y3,r3,w,h,'orange')

function fill(x,y,r,w,h,color){
  r = deg(r)
  ctx.fillStyle = color;
  ctx.translate(x,y);
  ctx.rotate(r);
  ctx.fillRect(0,0,w,h)
  ctx.rotate(-r);
  ctx.translate(-x,-y);
}
function rotate_pos(x,y,r) {
  var sin = Math.sin(deg(r))
  var cos = Math.cos(deg(r))
  return {
    x : x * cos - y * sin,
    y : x * sin + y * cos,
  }
}
function deg(r){
  return r * Math.PI / 180
}
</script>

いや〜できるだけ関数でまとめたんですが、コードが長くなってしまいました。
見切れてしまうんで、parentの座標を右にずらしましたが、それぞれのboxの起点をオブジェクトの左上になるように設置してみたんですが、無事に親に追従するように連携してくれました。
ポイントは、potate_posという関数ですね。
これが三角関数の処理をしているので、そのオブジェクトの親の起点からの距離と角度をいれると、誤差分の座標が取得できるというわけです。
それに親の座標を追加した値で表示すれば、親の座標に追従しているようにみえます。
canvasでのテクニックとしては、角度をctx.rotate、起点をctx.translate、でセットして、それをすぐに戻して、次のオブジェクトの準備にしているのがテクニックです。
1つずつオブジェクト処理せずに、親の回転値などを継承するやり方もあるかもしれませんが、かなり複雑になりそうなので、今回はシンプルにおこなってみました。
今回の実験で得られたこと
他人のこういう検証って、読み込むと納得できるんですが、実際に自分でやってみないとわからないわけですよ。
三角関数の処理方法を書いてあるページなんて、ググればたくさんあったんですが、見ても全く意味がわからないものばかりでした。
きっと今回のブログもその意味わかんねーブログの仲間入りだと思いますが、自分が理解できたらそれが正解と考えたほうがいいと思い、ブログ執筆に進みました。
ていうか、最初に書いたとおり、これは自分の備忘録です。
参考にして貰える人がいたら、幸いです。
 悩ましいプログラミングが大好物の、ユゲタです。
なんか難し〜な〜と思った処理を、1日ぐらいかけて成功させることができたら、その都度感無量です。
自分で自分を褒めたくなります。
そうしてまた、プログラミングが好きになっていくんですね。
今回は、HTMLで表示する、親子構造になっている階層構造の子階層を、親要素に追従するための処理を行う必要があって、その計算を三角関数処理で行う必要があったので、この意味わからない処理を実現させたソースコードを備忘録しておきたいと思います。
 これにそれぞれ同じ角度をつけてみると、次のようになります。

 ほぼほぼ同じ見栄えです。
 とりあえず、それぞれのboxを回転するのを確認できましたが、親子構造は作り手側でセットして、とりあえず完成形のソースは次のとおりです。
 いや〜できるだけ関数でまとめたんですが、コードが長くなってしまいました。
見切れてしまうんで、parentの座標を右にずらしましたが、それぞれのboxの起点をオブジェクトの左上になるように設置してみたんですが、無事に親に追従するように連携してくれました。
ポイントは、potate_posという関数ですね。
これが三角関数の処理をしているので、そのオブジェクトの親の起点からの距離と角度をいれると、誤差分の座標が取得できるというわけです。
それに親の座標を追加した値で表示すれば、親の座標に追従しているようにみえます。
canvasでのテクニックとしては、角度をctx.rotate、起点をctx.translate、でセットして、それをすぐに戻して、次のオブジェクトの準備にしているのがテクニックです。
1つずつオブジェクト処理せずに、親の回転値などを継承するやり方もあるかもしれませんが、かなり複雑になりそうなので、今回はシンプルにおこなってみました。


0 件のコメント:
コメントを投稿